We dealt with mix automation with our negative space and multitrack projects. Now we’re going to look at how we can apply automation to software instruments, and control that automation with a MIDI controller.
expanded automation
Any parameter in any plugin that can be adjusted with on-screen controls usually can be automated. For the Retro Synth this means that you can control the oscillator wave shape, tuning, vibrato amount, filter frequency cutoff, LFO amount, all envelope parameters for both Amp and Filter, and many other things.
Interesting sounds change over time. You should create such changes through the control of synthesis parameters in your patch/program/preset, but keep in mind that your synthesis parameters will remain constant from note to note. The only real variation you have comes from key velocity. Even the modulation wheel, which is used to control LFO and Vibrato depth is really an automation tool. More interest can be achieved through the use of automation to change a parameter over the course of multiple notes.
You should think creatively about how you want sounds to change over time, over multiple notes. As a general work habit, I tend to focus on
- filter cutoff frequency
- envelope parameters (both Amp and Filter), especially attack and release times
- LFO/vibrato depth and speed
- autobend amount (for applying a pitch envelope to the attack of a note)
Changing all of these parameters for every preset, all the time, is not necessary. What you focus on will depend on the type of sound and its use in the piece — how it combines with other sounds. For the purpose of this post, I’m going to use filter cutoff frequency control, amp and filter envelope release times.
using midi to control automation
You insert any type of automation with the mouse, like you did before with volume and panning. You can also take control of synthesis parameters in the Retro Synth on the screen while the track is running. But it is easy to control a performance over time by using MIDI to control automation parameters. With a MIDI controller, you can control multiple parameters at the same time using multiple faders and/or rotary encoders (knobs).
After you have decided what you want to automate, consider what parts of your controller you want to use. Some people will use knobs or faders to match the virtual on-screen controls; others will consider how many things will be moving at the same time. It is difficult to control more than two knobs at the same time, since each knob takes 2 – 3 fingers to operate. Faders are much easier when it comes to controlling multiples. Each fader can be controlled with one finger.
assigning midi controls to automation
Usually MIDI faders and encoders send data as MIDI Continuous Controller (CC) data, in the form of CC # and data value. DAWs like Logic can listen for incoming CC data and assign an automation parameter to the CC #, meaning you don’t have to investigate what CC #’s are being sent from your controller.
To assign a MIDI CC to a synthesis parameter, follow these steps:
- Select the parameter in the Retro Synth (or any synth or plugin) you want to control.
- Go to Logic Pro X > Control Surfaces > Learn Assignment for “<parameter name>” (parameter name should be the parameter you want to assign).
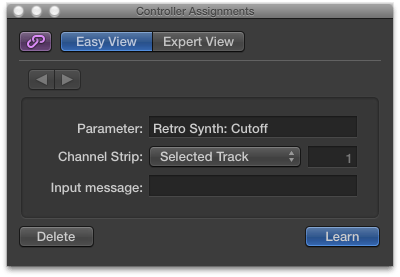
- The Controller Assignments window should appear in Easy View mode with the “Learn” button selected (in blue). see below
- Move any physical controller on a MIDI device connected to your computer. You should see the assignment being made in the assignment window, and you should see the parameter changing on the Retro Synth (or plugin).
- Close the controller learn window.
The Controller Assignment window to learn MIDI controller assignments (before an assignment is made – input message is blank)
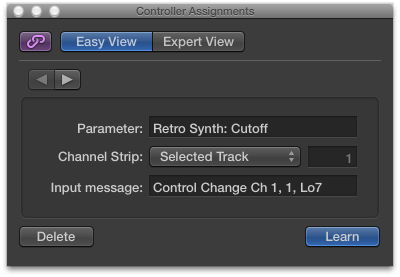
The Controller Assignment window after a controller has been assigned
recording automation
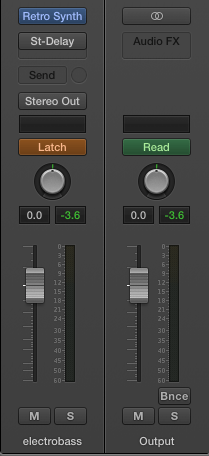
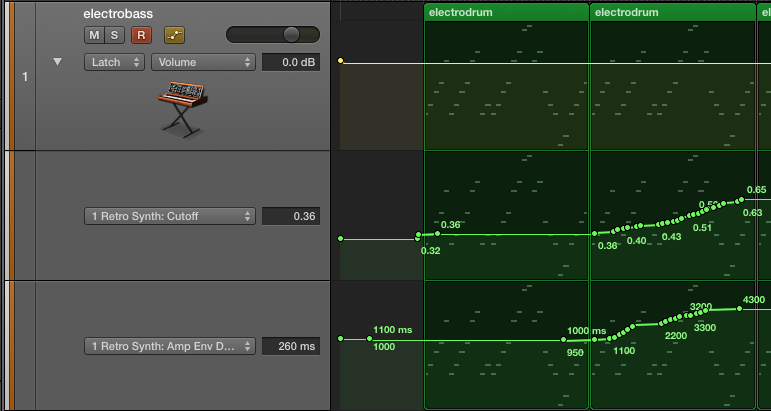
To record automation, you need to make sure automation is turned on, and you are in automation latch mode. Channel strips default to read mode, so you will generally need to change the automation mode. The selector is just above the pan knob in the channel strip. The image below shows the electrobass channel in latch mode and the output channel in read mode. If the automation selector has a gray background, automation is turned off. Move your mouse over the selector and an on/off switch will appear on the left (just like plugins).
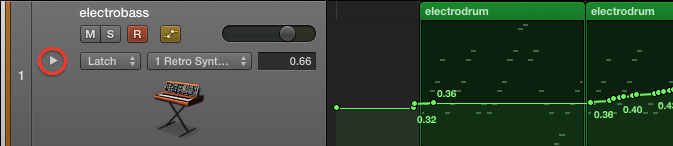
In latch mode, existing automation is read. Any automation that changes will overwrite the existing automation data in the track. Important: you do not press record in the control bar to record automation. Use play. You can record multiple automation parameters at one time. Each will write into the track. You can switch between them with the track automation view selector, or you can see all automation parameters in separate lanes (sub-track windows) by clicking on the triangle to the left of the automation mode in the track header.
collapsed
expanded
One final note: use the blank measure before your performance data starts to set initial automation values.
Leave a Reply