Digital Performer and other DAWs differ from stereo audio editors like Audacity, Peak, and Audition in that effects are usually applied in a non-destructive manner. Non-destructive effects processing means that the effect is computed and applied to the sound in real time during playback, but this processing does not change the contents of the audio file.
Non-destructive effects in Digital Performer are accessed, selected and applied via the Mixing Board window pane. The insert effect “slots” are at the top of each input channel. (The top-most slot is for pre-programmed effects. Avoid this top slot.) Click on the drop down arrow in a slot to see a list of effects inserts. The list will vary depending on the computer you are using, but will always have the MOTU effects. Choose the MOTU ProVerb for reverberation.
(Jeffrey Hass has a good, brief intro to reverberation on his intro to computer music site.)
ProVerb is a simple but very good convolution reverb. It convolves an input signal with an impulse response to recreate the sound playing in a given space. For your beginning purposes focus on the following parameters:
- the impulse response sample
- reverb length
- input gain
- output gain
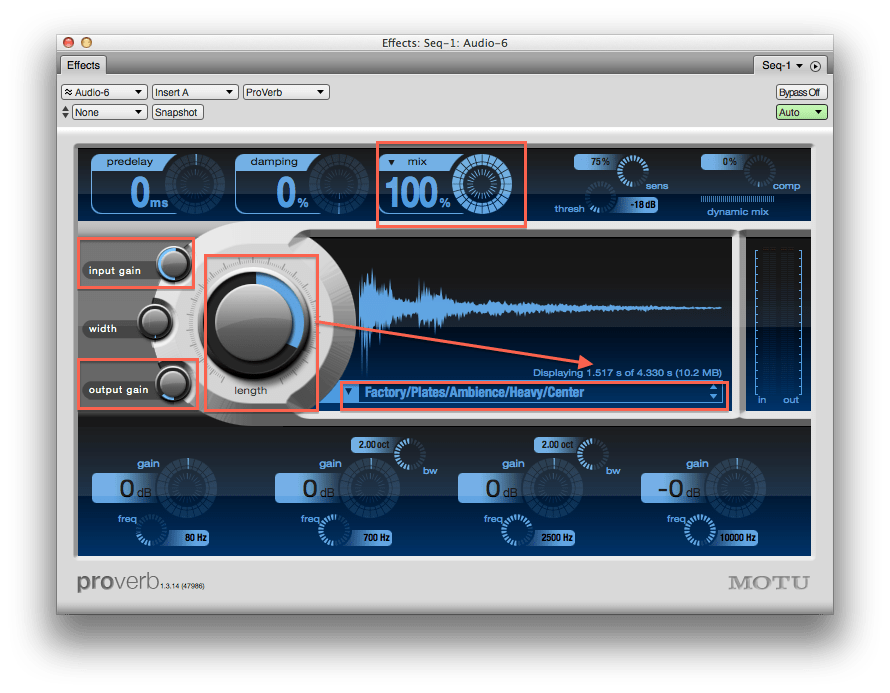
In the window above, input gain and output gain are controlled by knobs located center left. You can increase/decrease the audio signal to the ProVerb with the input gain, and you can do the same with the ProVerb output. Reverb length is controlled by the large dial near the middle of the window. You can see the selected reverb length displayed above the impulse response name. The first time is the reverb length you have dialed in; the second time is the maximum reverb length of the impulse response. The impulse response is chosen from the drop-down menu just below the waveform display. In the above example, I’ve chosen a plate reverb. Ambience is a sub-category of the plate, and heavy is a sub-category of ambience. (Heavy refers to the density of the reflections in this case.) All impulse responses will have choices for Center/Left/Right, and some will include Front and/or Back. These final choices refer to the location of the mic’ing when the impulse was recorded. A general tip for the beginning user is to choose Center.
The final parameter of our initial interest is the mix control, located top center of the window. Some reverbs will label the control with Dry and Wet at the extremes of the range. ProVerb uses a 0% to 100% indicator, with 0% equalling dry and 100% equalling wet. The percentage can best be thought of as percentage of wetness of the output signal. A dry signal has no reverb applied to it. A wet signal has reverb applied. The mix then allows you to choose the mix between unprocessed and processed sound in your output. Controlling signal gain and mix can give the impression of depth of field for your audio. Louder, dry signals (signals without reverb) appear to be close to you as a listener. Softer, reverberant sounds appear more distant.
All parameters of the ProVerb can be automated in your mix. In the sequence editor, you can choose to insert any ProVerb parameter in a track that has the ProVerb insert.
Leave a Reply